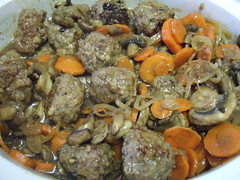
This recipe is from Cooking Light Magazine. I googled it to make for our Christmas Eve dinner. My husband's side of the family always has swedish meatballs and sausage on Christmas Eve.
This is a very tasty rendition, but I'm skeptical that it will taste authentic. For one, the recipe I usually use has cardamom on it and this on does not. Also, I do not usually have mushrooms and carrots. But...I forgot to bring the other recipe, and also the cardamom. Since cardamom is pretty expensive, this seemed like and easy way out.
1 pound ground round
3/4 cup dry breadcrumbs
1/2 cup fat-free milk
1/2 teaspoon salt
1/4 teaspoon ground ginger
1/4 teaspoon ground allspice
1/4 teaspoon black pepper
1 large egg white
Cooking spray
4 1/2 cups thinly sliced shiitake mushroom caps (about 8 ounces)
1 1/2 cups thinly sliced carrot
1/2 cup thinly sliced shallots
2 tablespoons all-purpose flour
1 (10 1/2-ounce) can beef consommé
1/2 cup water
1/2 cup reduced-fat sour cream
1/4 cup chopped fresh parsley
6 cups hot cooked yolk-free wide egg noodles (about 10 ounces uncooked pasta)
Combine the first 8 ingredients in a medium bowl. Shape mixture into 30 (1-inch) meatballs. Heat a large nonstick skillet coated with cooking spray over medium heat. Add meatballs; cook for 8 minutes, browning on all sides. Remove meatballs from pan.
Add mushrooms, carrot, and shallots to pan; sauté for 5 minutes. Stir in flour; cook 1 minute. Gradually add the consommé, stirring with a whisk; bring to a boil. Return meatballs to pan. Cover, reduce heat, and simmer 8 minutes. Add water; cook for 2 minutes. Remove from heat, and stir in the sour cream and parsley. Serve over pasta.
Yield: 6 servings (serving size: 5 meatballs, about 1/2 cup mushroom mixture, and 1 cup pasta)
Saturday, December 24, 2005
Tuesday, December 06, 2005
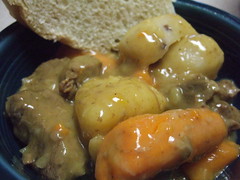
Old-Time Beef Stew
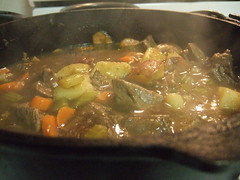
This was an excellent stew and did not take all day. It cooked just long enough to sit down and rest and enjoy the smell. It's from "The Lady & Sons Savannah Country Cookbook" by Paula Deen
2 lbs stew beef
2 Tbs vegetable oil
2 cups water
1 teaspoon Worchestershire sauce
1 clove garlic, peeled
1 or 2 bay leaves
1 medium onion, sliced
1 tsp salt
1 tsp sugar
1/2 tsp pepper
1/2 tsp paprika (I use half-sharp from Penzeys)
Dash of allspice or ground cloves
3 large carrots, sliced
4 red potatoes, quartered
3 ribs celery, chopped
2 Tbsp cornstarch
Brown meat in hot oil. Add water, Worchestershire sauce, garlic, bay leaves, onion, salt, sugar, pepper, papricka, and allspice. Cover and simmer 1 1/2 hours. Remove bay leaves and garlic clove (I actually chopped my garlic before putting it in and then left it in). Add carrots, potatoes and celery. Cover and cook 30 to 40 minutes longer, or until potatoes and carrots are tender.
Here's where I veered off: She says to thicken the gravy, you should remove 2 cups of the broth. Combine the cornstarch with 1/2 cup water, stirring until smooth. Mix it with the hot liquid and then return it to the pot.
Mix the cornstarch and water and drizzle it directly into the pot, stirring carefully so as to not break up the potatoes or mash the carrots. Simmer for a few more minutes to allow the cornstarch to cook a bit.
One more note: usually when I make beef stew, I use a pot roast because often I can find it on sale and it's cheaper and more tender than stewing beef. But this time I used stew beef because it was on special. It was very tender.
Wednesday, November 30, 2005
Turkey Gumbo Soup
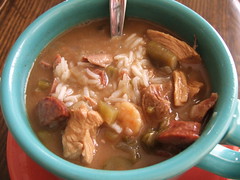
The bad thing about taking photos of your food is eventually you start realizing that you keep using the same bowls over and over. Maybe someone needs to give me more soup bowls for Christmas!
Anyway, this Turkey Gumbo I made was such a smash hit that everyone in the family ate several helpings of it and we were negotiating for leftovers. I think I ate the last bowl of it for breakfast one day.
This recipe is adapted from one by Emeril Lagasse. Emeril did it on Good Morning America in 2002 and I printed it off right away. The other day I tried to google it up on the Food Network site and found it gone. No matter. I pretty much veered off it right after the roux and "trinity" anyway.
3/4 cup oil
3/4 cup flour
2 large onions, chopped
1 large green pepper, chopped
3 or 4 stalks celery, chopped
1/2 pound smoked sausage (I use Carolina Pride), andouille or kielbasa, cut in half the long way and then chopped into bite-sized pieces the short way
Turkey broth from boiling the carcass
Okra
Leftover turkey
Some shrimp (maybe 12 ounces?)
Salt, to taste
Cayenne, to taste
2 Bay leaves
File powder
Cooked rice (I prefer Basmati)
Combine the oil and flour in the bottom of a 5 quart dutch oven. Cook on medium, stirring constantly, until it turns the color of a chocolate bar. Emeril says it should take as long as it takes to drink 2 beers. It's about 25 minutes.
Add the onions, bell pepper and celery. Add a pinch of salt and a dash of cayenne. Cook, stirring until the vegetables are coated with the roux and the onion starts to get translucent.
Add the sausage. Cook until the sausage starts to rend its' fat.
Add the okra and enough turkey broth to make the soup the consistency you want. You may wish to make it thinner than the final product, as you have to add the turkey and shrimp later. You can always add more broth at the end, though.
Drop in the bay leaves and adjust the seasoning. You may not need much salt, since the sausage pretty much takes care of that.
Bring it to a low boil. Turn down to a simmer and cover. Allow it to cook for a while. Maybe an hour. But if you are hungry now, just go 15 minutes.
About 10 minutes before you eat it, add the turkey and the shrimp. Adjust the broth amount and seasonings. Now is when I put in most of the final amount of cayenne.
Serve over rice and sprinkle each serving with File powder.
Now, you don't have to have okra in your gumbo. And you really could have some tomatoes in there. I like tomatoes in mine. I just didn't put them in this time because the broth was already fairly thin and I didn't want to thin it out more.
Friday, November 25, 2005
Dry-Brined Turkey
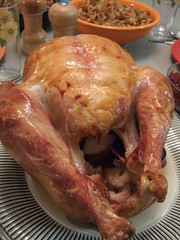
12 lb turkey, giblets and neck removed (do not use a self-basted turkey)
1/3 cup kosher salt
1 medium onion, halved with skin on
sprigs of thyme and rosemary (optional)
The night before roasting, thoroughly rinse and dry the turkey. Place it on a rack in its roasting pan. Sprinkle the entire turkey, inside and out, with the kosher salt. Refrigerate overnight.
4 hours before serving, remove the turkey from the refrigerator, rinse and pat dry. Return it to the roaster, breast-side down on the rack. Place onion, thyme and rosemary into the neck cavity. Let the turkey rest on the counter for 1 hour. Preheat the oven to 400 degrees.
3 hours before serving, begin roasting the turkey breast-side down. After 1 hour, remove it from the oven and turn the turkey breast-side up. Roast another 1 1/2 hours, or until the thigh registers 175 degrees.
Rest the turkey for 30 minutes before carving.
Adapted from “Fine Cooking Magazine,” November, 2005.
Tuesday, November 15, 2005
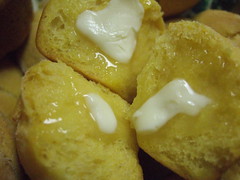
Squash Rolls
3/4 cup sugar
1 package (2 1/2 teaspoons) yeast
2 teaspoons salt
1/2 cup nonfat dry milk
1 cup warm water (110-115 degrees)
1 Butternut squash
3 Tablespoons canola oil
5 cups flour
Pare squash and cut into uniform chunks. Place chunks in a microwavable dish with 1/4 cup water and cover. Microwave on HIGH 4 minutes. Stir. Cook another 5 minutes, or until tender. Drain thoroughly. Mash chunks finely or put through a potato rice or food mill. Measure out 1 cup of the mashed squash.
In the large mixing bowl of a stand mixer, add 2 cups of the flour, sugar, yeast, salt, and dry milk. Stir to combine, using the beater attachment. Add water, the cup of mashed squash and oil. Beat on medium speed until well-combined. Change to dough hook on mixer and turn mixer to second-lowest setting. Add flour, 1/2 cup at a time, until the dough climbs the hook. Run the mixer another 10 minutes to knead the dough. The dough will be as thick as bread dough, but quite sticky.
Turn dough into a greased bowl and cover loosely with plastic wrap. Allow to rest 1 hour.
Grease 2 12-cup muffin tins. Break pieces of dough off and roll each piece into a 1-inch ball. Place 3 balls into each muffin cup. Spray tops with cooking spray, or brush lightly with oil. Lay plastic wrap lightly over each full tin and let rest 1 hour.
After 30 minutes, preheat oven to 400 degrees. Bake for 20 minutes.
Yield: 24 rolls
Cook’s notes: A lighter roll can be achieved by allowing the dough to rest before adding the last 3 cups of flour. Also, the rolls can be shaped any way you normally do dinner rolls. Do not be alarmed by how sticky the dough is, or if it doesn’t appear to raise much at each resting period. If desired, half the dough can be frozen in a zip-top bag for later use. Simply thaw at room temperature and shape into rolls, or shape them and freeze them in the muffin tin. This dough also makes excellent cinnamon rolls.
Recipe courtesy Mary Goetsch.
Saturday, November 12, 2005
Moussaka
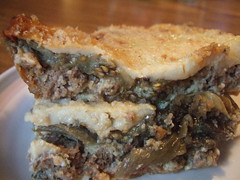
Meat Sauce
1 1/2 lb ground beef
2 teaspoons butter
1/2 cup dry white wine
2 medium onions, finely chopped
1 Tablespoon ketchup, diluted with 1 cup water
salt & pepper
1/2 teaspoon nutmeg
1/2 cup parsley, chopped
1/2 cup dry breadcrumbs
1/2 cup parmesan cheese
2 egg whites (save yolks for béchamel sauce)
Brown the hamburger in a large skillet. Drain and rinse the hamburger with warm water. Return to skillet and add butter and onions. Cook, stirring occasionally, until onions are translucent. Add wine and diluted ketchup, parsley, and salt and pepper to taste. Cook over low heat until all the liquid is absorbed. Remove from heat and cool slightly. Add the breadcrumbs and the parmesan. Allow the mixture to cool completely and then stir in the egg whites.
Eggplant
2-3 eggplants
Preheat broiler.
Peel and slice eggplants the long way. Keep the slices fairly uniform in thickness, approximately 1/2 inch thick. Soak the eggplant slices in salted water for 10-15 minutes (this step can be skipped if you are using eggplants that are not as bitter –see cook’s notes at bottom of this recipe).
Drain the eggplant slices and pat them dry with paper towels. Brush them with olive oil, or spray them with cooking spray. Lay the slices in a single layer on cookie sheets that have been sprayed with cooking spray, or on silicone cooking mats.
Place the eggplant slices under the broiler. Do Not Walk Away! Watch them as they turn golden brown under the broiler. Pull them out and turn them over. Brown the other side. Remove and hold at room temperature.
Béchamel Sauce
3 Tablespoons butter
4 Tablespoons flour
3 cups milk, scalded
dash nutmeg
2 egg yolks (from the hamburger sauce recipe)
In a large saucepan, melt the butter. Add the flour and cook, stirring, until smooth. Gradually add the milk. Cook until fairly thick. Add the dash of nutmeg (take care that
the nutmeg does not overpower the sauce). Cool to room temperature. Add egg yolks, one at a time.
Assembling the Moussaka
Hamburger sauce
Béchamel sauce
Eggplant slices
1/2 cup breadcrumbs
1/2 cup parmesan cheese
Preheat oven to 350.
Moussaka is essentially put together like lasagna. The eggplant slices take the place of the lasagna noodles, and the béchamel sauce is used instead of a tomato sauce.
Spray a 9x13 pan with cooking spray. Coat the bottom with 1/4 cup of the bread crumbs.
Begin building the moussaka by placing 1/2 of the eggplant slices, overlapping if necessary, to cover the bottom of the pan. Sprinkle with 1/2 of the parmesan. Cover with 1/2 of the hamburger mixture. Spread 1/2 of the béchamel sauce on top. Layer the remaining eggplant on top, cover with the remaining hamburger mixture and spread on the remaining béchamel sauce. Finish by sprinkling the rest of the parmesan cheese on top.
Bake for about 45 minutes, until heated through (165 degrees) and golden brown on top. Serve with tomato slices
Serves 8-10
Cooks notes: Moussaka is a Greek dish that is traditionally made with ground lamb. This recipe came from a Greek cooking class taught by the Minnesota Extension Service. Seasoning may need to be changed if ground lamb is used.
The hamburger sauce can be made a day ahead and held in the refrigerator.
Thursday, November 03, 2005
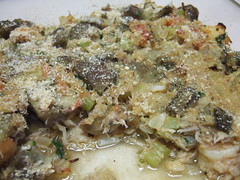
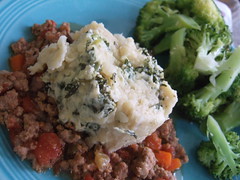
Kale Potato Gratin
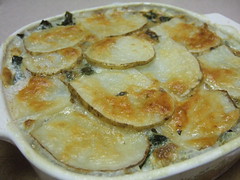
1 bunch (about 1 pound) kale, washed and trimmed
1 1/4 pounds all purpose potatoes, sliced fairly thin
1 medium onion, chopped or sliced
1 tablespoon butter, cut into pieces
2 dashes nutmeg
1/2 teaspoon kosher salt
1/4 teaspoon freshly ground black pepper
Approximately 1 1/2 cups low fat milk
1/2 cup grated gruyere cheese (optional)
Heat oven to 400 degrees.
Steam kale about 10 minutes. Drain and cool. Press out excess water and chop coarsely. In a greased 2 quart shallow dish, alternate layers of potatoes, onion, and kale, salting, peppering and sprinkling nutmeg on each layer and beginning and ending with potatoes.
Press down the ingredients, being sure it is distributed evenly. Pour milk over the mixture, stopping when the milk just begins to come up around the edges. Press down on the mixture again to release any air bubbles.
Sprinkle the top with cheese and dot with butter. Cover the dish loosely with foil and bake for about 45 minutes. Uncover and cook another 10 minutes, or until the top turns a golden brown.
Note: any greens will work in this dish. The more tender ones will not need steaming.
Thursday, October 27, 2005
Thanksgiving Ideas Wanted
The Lancaster News has asked me to write about Thanksgiving Dinner. I could certainly use some new, fresh ideas. Email me!
While you're at it, if you have any unusual but simple Christmas treat recipes, that would be cool, too.
While you're at it, if you have any unusual but simple Christmas treat recipes, that would be cool, too.
Tuesday, October 25, 2005
Minestrone Soup
Usually my minestrone soup has pasta in it. But I read on Italian Food Forever that it can be thickened with potatoes or even bread, depending upon the chef or time of year. So I decided to put potatoes in mine this time. This was fantastic soup and the potatoes were an improvement over the pasta because they don't swell up and take over the entire pot the next day. When I do pasta, I have to keep it out of the soup and put spoonfuls in each serving.
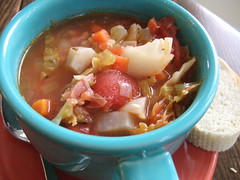
1 Tablespoon Olive Oil
4 oz country ham trimmings, diced (about 3/4 cup)
2 large or 3 medium carrots, diced (about 1 heaping cup)
3 ribs celery, diced
2 leeks or 1 medium onion, diced
3 cloves fresh garlic, smashed and minced
4 C chicken stock –use low sodium, if canned
2 C water
1 tsp dried rosemary
1/2 tsp dried basil
1/8 tsp red pepper flakes
1/2 tsp freshly ground black pepper
Salt
1-28 oz can whole tomatoes, chopped with juice
1 15.8 oz can great northern beans (or any bean of your choice), drained and rinsed
2 C potatoes, diced
2 C cabbage, chopped
Heat olive oil and country ham in a 5 or 6 quart pot over medium-high heat until the ham begins to brown. Add carrots, celery and leeks or onions. Cook, stirring constantly, until the vegetables become translucent, about 5 minutes. Add the garlic and cook and stir for another minute. Add stock and water, rosemary, basil, pepper flakes and black pepper.
Salt to taste. Bring to a boil and then lower heat to a simmer. Cover and cook, stirring occasionally, for about an hour.
Add tomatoes, beans, potatoes and cabbage. Bring back to a simmer and allow to cook another 20-30 minutes, until potatoes are cooked to your liking.
Friday, October 21, 2005
Empanada and Malta Polar
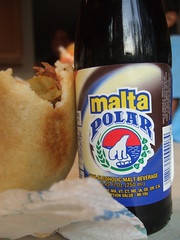
1/2 cup arepa flour (see note)
1 tablespoon all-purpose flour
1 teaspoon sugar
Pinch salt
1 1/2 cups warm water
1 teaspoon oil, plus extra for cooking
Filling (see recipe below, or fill with your own recipe)
Preheat oven to 350 degrees.
In a bowl, mix flours, sugar and salt. Add the water and mix with a spoon until the dough is incorporated. Cover with plastic wrap and let rest for 5 minutes. Remove the dough from the bowl and knead for about 5 minutes, moistening your hands and the board with water as you work. The dough should be smooth and not crack around the edges; moist and not sticky.
Pinch off about half of the dough. Roll out, on a floured surface, to a 1/8 inch thickness. Cut out circles about 3 inches in diameter. Gather the scraps, add to the rest of the dough and roll out another batch. Repeat until you’ve used as much as you can.
Place a spoonful of filling in the center of each circle of pastry. Fold over the pastry and seal the edges. Let the empanadas rest for 30 minutes.
If baking: preheat oven to 400 degrees. Bake until golden, about 15 minutes. If deep frying, heat 3 inches of oil in a pot to 375 degrees and fry until golden brown, about 1 to 2 minutes on each side. (If you are deep-frying, you want to be absolutely sure they sealed tightly!)
Meat Filling:
Skirt Steak-trimmed of fat
3-4 cloves garlic, divided
1/2 small onion, halved
Pinch salt
1/2 bell pepper, halved
1 rib celery-cut in half
Beef bouillon (optional)
Water
1 1/2 tablespoons oil
1-2 tablespoons tomato paste
Place the steak in a large pot. Smash 2 cloves of the garlic and add to the pot with half the onion, salt, half the pepper, and the rib of celery. Add beef bouillon, if using. Add water to cover. Bring to a boil. Turn the heat to low and simmer until the steak is cooked through. Remove the meat from the broth and shred with 2 forks. Reserve the broth.
Mince more onion, peppers and garlic until you have 1 1/2 cups minced veggies. Place the veggies and shredded meat into a non-stick skillet with oil. Stir together and add tomato paste. Add some of the cooking water from boiling the meat. Cook, stirring, until all ingredients are combined and vegetables are cooked. Adjust seasonings to taste.
Cooks note: Arepa flour is a precooked corn flour. Do not confuse it with masa harina or cornmeal. Arepa flour is sold as masarepa, harina precocida or masa al instante. It can be found in Latin American groceries, such as the Food Bazaar on South Boulevard in Charlotte.
Recipe courtesy Zuleika Mendoza
For The Lancaster News
Wednesday, October 19, 2005
Creole Eggplant Gratin
I found this by googling eggplant + gratin. It was on a website called "Foodfest" (see link at the end of this post). This fellow named Tom Fitzmorris had it on there. He tells about eating it at Delmonico in New Orleans before Emeril LaGasse took over the business.
I made this for the family and served it with a green salad. We thought it was pretty good, but I know we won't repeat it. It took longer to put together than it did to bake it. And the kids really aren't eggplant fans.
2 eggplant, peeled and cut into large dice
2 Tablespoons butter
1 medium onion, chopped
2 ribs celery, chopped
1 cup small peeled shrimp (I could not find small uncooked shrimp, so used 1/2 lb of medium)
1/2 lb claw crabmeat
1 chopped tomato (they are not in season now, so I used canned)
1 dash Tabasco sauce
1 dash Wocestershire Sauce
1/4 teaspoon marjoram
3 sprigs fresh parsley, chopped
1/2 teaspoon lemon juice
1/2 teaspoon salt
1/4 cup bread crumbs (I used prepared ones)
Preheat oven to 350 degrees.
Blanch cut eggplant in boiling water for 2 minutes. Remove and reserve.
Heat butter in a large skillet. Saute the onion, celery and shrimp just until the shrimp turns pink. Add all the other ingredients except the bread crumbs and eggplant and cook, stirring lightly, until everything is heated through.
Add the eggplant and gently blend with the other ingredients.
Pour mixture into a buttered 9 x13 pan. Sprinkle with bread crumbs.
Bake for about 15 minutes, or until the bread crumbs are toasty.
Serves four to eight.
Monday, October 17, 2005
Beef & Broccoli
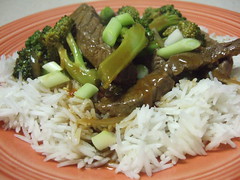
I did this for The Lancaster News
2 stalks broccoli, cut into florets
1 package beef for stir fry –or 1/2 to 1 lb flank steak, cut into strips
1 can beef broth, divided
1 teaspoon chili-garlic sauce (optional)
1 teaspoon black bean paste (optional)
1/2 teaspoon fish sauce (optional)
2 cloves garlic, minced
1/2 teaspoon minced ginger
1/2 medium onion, halved then sliced thin
3 tablespoons low-sodium soy sauce
2 tablespoons corn starch
Sesame oil
2 tablespoons Canola oil
Heat a large skillet or wok over high heat. Pour the canola oil into the hot pan* and add the strips of beef. Cook, stirring constantly, until the beef has lost its pink color. Remove from pan.
Place the broccoli, onion and garlic into the pan and cook, stirring constantly, until the broccoli starts to get crisp tender and the onion has begun to turn translucent, about 3 minutes. Add small amounts of water, if necessary, to keep it from sticking or burning. Add the ginger, chili-garlic sauce, black bean paste and the fish sauce, if using. Cook for another minute.
Reserve 1/4 cup of the beef broth. Pour the remainder into the broccoli mixture. Add the soy sauce. Turn the heat down until the mixture is simmering. Add the beef.
Combine the reserved 1/4 cup of beef broth with the cornstarch to make a slurry. Drizzle into the simmering beef and broccoli, stirring constantly. Cook, stirring, until mixture is thickened.
Remove from heat and drizzle with sesame oil. Serve over hot rice.
*The late Jeff Smith, the “Frugal Gourmet,” once said on his television show, “Hot wok, cold oil, food don’t stick.” This tip has always come in handy for me when it comes to stir-frying.
Tuesday, October 04, 2005
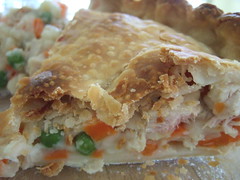
Chicken Pot Pie
This is one of our favorite ways to use leftover chicken or turkey. Served with cranberry sauce, it's a wonderful, comforting meal.
The recipe is from Betty Crocker's Cookbook, 1981. It calls for celery seed pastry, but I use frozen pie crusts. I have made the celery seed dough and found it to be quite good. But most of the time I'm just throwing this together.
1/3 cup butter
1/3 cup flour
1/3 cup chopped onion
1/2 teaspoon salt
1/4 teaspoon pepper
1 3/4 cup chicken or turkey broth
2/3 cup milk
2 cups cut-up cooked turkey or chicken
1 package (10 oz) frozen peas and carrots
Heat butter over low heat until melted. Blend in flour, onion, salt and pepper. Cook over low heat, stirring constantly, until mixture is smooth and bubbly; remove from heat.
Stir in broth and milk. Heat to boiling, stirring constantly. Boil and stir 1 minute. Stir in chicken and frozen vegetables; reserve.
Prepare pastry. Ease one crust into a 9x9 square pan, or a quiche pie plate.
Pour filling into the pastry-lined pan.
Roll remaining pastry over the top and seal all around the edges. Cut slits to allow steam to escape.
Cook uncovered in a 425 oven until crust is brown, 30-35 minutes.
cooks notes: Use any vegies you want in this. I frequently use frozen mixed veggies, but I have used fresh veggies that I've steamed in the microwave. Okra goes well in this, too.
Cover the edges of the pastry with narrow strips of foil if they appear to be browning too quickly. This can be made as "fat" or "lean" as you want. You can use margarine, skim milk, etc.
For The Lancaster News
Saturday, September 24, 2005
Gnocchi Roll with Ragu Bolognese
I see no particular reason why I should only document the SUCCESSFUL dishes I pull off. Actually, this dish was successful in that it was simply delicious, both last night and this afternoon for lunch. It was just ugly. It was supposed to look like a jelly roll, but of potato gnocchi dough and spinach filling. Instead, I got a mess. But I've angled the picture here to minimize the visual disaster that it was.
I had a half day off from school yesterday so I decided to spend the afternoon cooking. I chose this because I knew the men in my life would like it. What's not to like about lots of potatoes and MEAT?
The first thing I assembled was the
Ragu Bolognese
6 Tablespoons butter
1 cup coarsely chopped onion
1/2 cup coarsely chopped celery
1/4 cup coarsely chopped carrot
1/2 lb lean ground chuck
3/4 lb lean ground pork
1/2 cup dry white whine
1 cup milk
1 lb ripe tomatoes, peeled, seeded, and finely chopped (1 1/2 cups), or 1 1/2 cups drained and finely chopped canned Italian plum tomatoes
1 tablespoon finely chopped fresh parsley
salt
freshly ground black pepper
freshly grated nutmeg
Melt the butter in a 2 quart heavy, non-reactive saucepan. Add the vegetables (italians called it the soffrito) and cook, stirring frequently, for about 10 minutes or until the vegetables are lightly brown.
The ground meats are supposed to be ground very finely. The recipe suggests grinding them together twice, using the finest blade of a meat grinder. I don't have a meat grinder, so I put them in the food processor for a bit.
Add the ground meats, mashing them into the soffrito with a large spoon. Continue this until there are no large lumps and the meat is all broken up. Raise the heat and cook for about 3 minutes, until the meat is no longer pink.
Add the wine, bring it to a boil and stir constantly. Cook until the wine is almost completely evaporated.
Add the milk, cooking and stirring until it is almost completely evaporated.
Add the chopped tomatoes, bring the sauce to a boil again, and then reduce the heat to its lowest point. Half-cover the pan and simmer the sauce for 3 hours. I put mine on my "simmer burner" on about half-way. Stir every now and then. By the end of 3 hours, most of the liquid will be cooked away and the sauce will be very thick and intensely flavored.
Add the parsley. Taste for seasoning and add as much salt, pepper and nutmeg as desired.
While that was simmering, I prepared the
Gnocchi Roll
3 large Russet potatoes, baked, peeled and pureed
2 tablespoons butter
3 eggs, 2 lightly beaten together
1 cup plus 2 tablespoons flour
pinch of freshly grated nutmeg
1 1/2 teaspoons salt
freshly ground black pepper
1/2 cup freshly cooked spinach, drained, squeezed dry, and minced; or 1 (10-oz) package frozen chopped spinach, cooked, drained, and squeezed dry
1 1/3 cups ricotta
1/4 cup freshly ground romano cheese
Place pureed potatoes in a medium bowl and add half the butter; mix until melted. Add the whole egg, 1 cup flour, nutmeg, 1/2 teaspoon salt, and a pinch of pepper; mix well and form into a ball. Wrap and chill for about 1/2 hour.
In a bowl, mix spinach, ricotta, remaining butter, beaten eggs, cheese, remaining flour, and salt and pepper to taste.
Sprinkle 2 tablespoons flour on a piece of wax paper that is about 12x14 inches in size. Roll out the dough into a 9x12 rectangle (Use more flour, if necessary). Spread filling over dough, leaving a 1-inch border all around the outside. It was at this point that I had an inkling that things were going to be horribly wrong. I had twice, maybe three times, too much filling for this little roll. But did I stop and cut back? Of course not! I went ahead and spread all of it on there, knowing full well I would have trouble rolling it.
Fold over the bare edges on 2 long sides and 1 short side.
Roll up the dough from the open short end as you would a jelly roll, using the wax paper to help you. Press edges in to seal. Yup. Terrible, terrible mess. Would not roll. Spinach everywhere. But I soldiered on. I got it all stuck together and quickly went to the wrapping step. I knew it would still taste good, just not LOOK good!
Very carefully wrap the roll in a clean white cloth. Tie ends tightly with kitchen string. Secure the middle of the wrap with a large safety pin. Wrap again in cheesecloth. Secure ends with 2 more safety pins. You'll need the double wrapping to prevent the roll from opening.
Place the wrapped roll into a large heavy pan, approximately 13x14 inches (but since it was only about 9 inches long, I was able to put mine in my large, 5 quart dutch oven). Add enough water to completely cover the roll. Place over on the stove and cover. Bring to a boil and then cut back the heat to a simmer.
Simmer for 1 hour and 30 minutes. Remove the roll from the pan very gently (I used the lid of the pan to drain the water and then simply tipped the pan upside-down so the roll was resting on the inside of the lid. Then I was able to just roll it off onto a platter. Wouldn't work if you had a lipped lid, though).
Remove the cloth and cheesecloth and slice. Serve with Ragu Bolognese.
Will I do this dish again? Well, it did take pretty much of 3 hours to do it. But it was excellent! Too ugly for company, though. I might do it at least one more time with half the filling and I might roll the dough out a bit thinner so I'll have a bigger surface. I think I'll also use parchment paper instead of was paper. I think it will hold up better. Or better yet, I'll use my Silpat to roll it up.
This recipe is from "The Joy of Pasta" by Joe Famularo & Louise Imperiale. Copyright 1983 by Barron's Educational Series, Inc.
Friday, September 23, 2005
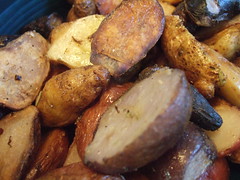
Pan-Roasted Potatoes
Have I mentioned before how much we love these things? And we get a lot of fingerling potatoes from our farmer, so we are able to have them quite often.
I see no reason why one couldn't use ordinary russets, cut into bite-sized pieces, for this.
Clean your fingerling potatoes and cut them into fairly uniform pieces. Don't stress out about it. You'll just end up with some of the smaller ones getting more "roasty" than the big ones.
Par-boil them in a large pot of very, very salty water. "Salty like the sea" pretty much. I use kosher salt.
Once they are starting to get soft, drain them and put them into a skillet with some butter and a little olive oil. The olive oil will keep the butter from burning. You could go with all oil if you want.
Toss in some garlic and maybe a little onion. Start cooking them on medium heat, stirring/tossing them every once is while, until they are as browned as you want them to be.
Toss in fresh herbs, like rosemary or thyme, if you want. If you use fresh, put them in a little early, so they will roast with the potatoes. If dried, put them in near the end.
Generously salt and pepper and serve.
Wednesday, September 21, 2005
Vegetable Paella
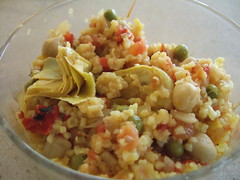
I liked this dish, but it didn't go very far with the family. Later my husband admitted that they all opened the crockpot, said "Ooooh! Vegetable Paella!" and then "argh! Artichokes!"
2 cups converted rice
1 cup chopped onion
1 cup chopped green pepper
1/4 cup chopped, drained oil-packed sun-dried tomatoes (reserve the oil)
1 1/2 Tablespoons sun-dried tomato oil
1 teaspoon salt
1 (14 1/2-ounce) can Mexican-style stewed tomatoes, undrained and chopped
1 (7.25-ounce) jar roasted red bell peppers, drained and chopped
4 cloves garlic, chopped
2 (14 1/2-ounce) cans vegetable broth
1 (1/2 gram) package saffron threads (1 teaspoon)
1 (16-ounce can chickpeas, rinsed and drained
1 (14-ounce can quartered artichoke hearts, drained
1 cup frozen green peas
Place first 9 ingredients in a crockpot (3 1/2-qt to 4-qt) set on low.
Combine broth and saffron. Add to crockpot, mixing well. Cover. Cook for 4 hours or until rice is tender and liquid is absorbed.
Stir in chickpeas, artichoke hearts and green peas. Cover and cook another 15 minutes.
Yields 7 2-cup servings
From the "Southern Living Slow Cooker Cookbook"
More notes: I could not find sun-dried tomatoes in oil that weren't pureed. They seemed to all be sold as "sun-dried tomato pesto". So I bought dried ones, reconstituted them, and then used olive oil instead of tomato oil. I probably could have simmer the tomatoes in oil to infuse it, but I didn't have time.
I also was not able to buy "mexican-style stewed tomatoes." So I used Rotelle tomatoes. And lastly, I really think canned vegetable broth is terrible. So I make homemade stock periodically from veggies that are going soft in the fridge, freezing them in 2-cup containers. I used 29 ounces of that instead of canned.
Sunday, September 11, 2005
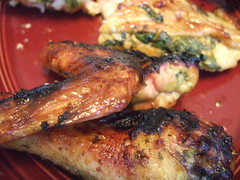
Thai BBQ Chicken
Can you deal with more barbeque chicken recipes? I just love trying new ones. This was a great hit and wonderful as leftovers, too.
This is from "101 Garlic Recipes," by Publications International.
1 cup coarsely chopped cilantro
2 jalapeno peppers, coarsely chopped (I removed the seeds from one and left the other)
8 cloves garlic, peeled and chopped
2 tablespoons fish sauce(available in any grocery store and should always be in your fridge for stir fries)
1 tablespoon packed brown sugar
1 teaspoon curry powder
Grated peel of 1 lemon
1 cut-up frying chicken (3-4 pounds)
Place cilantro, peppers, garlic, fish sauce, brown sugar, curry powder and lemon peel in blender or processor and blend to form a coarse paste.
Rinse chicken pieces; pat dry. Work fingers between skin and meat on breast and thigh pieces. Rub about 1 teaspoon of the seasoning paste under the skin of each piece. Rub chicken pieces on all sides with the remaining paste. Place chicken in a large zip-top bag and marinate in fridge for 3 to 4 hours or overnight.
Prepare grill with charcoal over to the side. Grill the chicken, alternating between direct and indirect heat, until done, about 40 minutes.
Can be cooked in the oven at 375 for 30-45 minutes.
Thursday, September 08, 2005
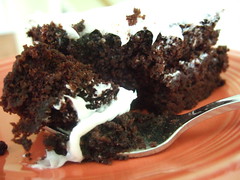
My Favorite Chocolate Cake
Here's a recipe I clipped from Good Housekeeping Magazine in October of 1982. It was in an ad for Hershey's Cocoa and I've made this cake dozens of times over the years.
1 3/4 cups unsifted all-purpose flour
2 cups sugar
3/4 cup Hershey's cocoa
1 1/2 teaspoons baking soda
1 1/2 teaspoons baking powder
1 teaspoon salt
2 eggs
1 cup milk
1/2 cup vegetable oil
2 teaspoons vanilla
1 cup boiling water
Preheat oven to 350.
Combine dry ingredients in a large mixing bowl. Add remaining ingredients, except for boiling water. Beat at medium speed for 2 minutes. Remove batter from mixer, stir in the boiling water. The batter will be thin. Pour into two greased and floured 9" or three 8" layer pans or one 9x13 pan.
Bake at 350 for 30-35 minutes for layers, 35-40 minutes for the 9x13 pan, or until a toothpick inserted in the the center comes out clean. Cool 10 minutes on a rack, remove from pans and cool completely.
I like to frost mine with cream cheese frosting.
Monday, September 05, 2005
Tomato Sauce
This is a good, all-purpose tomato sauce that can be whipped up in minutes, and tastes fresher than jarred.
1/4 Cup Olive oil
1 medium onion, chopped
2-3 garlic cloves, minced
fresh or dried basil, oregano or other herbs
2 (28-ounce) cans whole tomatoes or 5 or 6 large fresh tomatoes, peeled and chopped
Salt and Pepper
Heat the oil in a sauce pan over medium heat. Add the onion and garlic. Cook, stirring frequently, for 5 minutes to soften. Add dry herbs, if using. Add the tomatoes, crushing canned ones with your hand. Cook, stirring frequently, until the liquid is cooked down and the sauce thickens, about 10 minutes. Add salt and pepper and fresh herbs, tearing any large leaves. Adjust seasonings to taste. Cover and remove from heat until ready to use.
For The Lancaster News
Saturday, September 03, 2005
Pizza Dough
Makes 4 individual pizzas
1 package (2 1/4 teaspoons) active dry or instant yeast
1 1/2 cups very warm (110 degrees) water
4 cups All Purpose or Bread Flour
1 1/2 teaspoons kosher salt
2 tablespoons olive oil
“Proof” your yeast by stirring it into the warm water until dissolved and letting it start to foam. If using instant yeast, skip this step.
With a mixer on low speed, mix together 2 cups of the flour, the salt, olive oil, yeast and the water until well-blended. Allow the mixture to rest in the mixing bowl for 30 minutes to 2 hours.
After resting, remove the mixing blade and switch to a dough hook, or change to hand mixing with a large, sturdy spoon. Add in the remaining 2 cups of flour, 1/2 cup at a time, until the dough climbs the hook or reaches a firm, satiny texture.
Knead the dough, either with a mixer on low or by hand, for 10 minutes.
Turn the dough into a large, oiled bowl. Cover loosely with plastic wrap and let rise in a warm part of the kitchen for about 1 1/2 hours.
After the dough has risen, turn it out onto a floured surface without punching it down. Cut the dough into 4 equal pieces and shape each portion into a smooth ball. Let it rest for 10 minutes before shaping into pizza crusts.
For pizza in the oven: place 4 unglazed quarry tiles on the bottom rack of the oven. Heat the oven to the highest temperature it will allow. Cook the pizzas one at a time. After shaping the dough ball into a crust(how to actually shape it into crusts that retain some air and light texture is fodder for another entry someday), lay it on a pizza peel that has been sprinkled with cornmeal. The back of a cookie sheet will substitute for a peel. Dress the pizza and then place it directly onto the tiles by sliding it off the peel or cookie sheet. Cook each pizza approximately 8 minutes. Remove from the oven with the pizza peel or a very large spatula.
For The Lancaster News
Thursday, September 01, 2005
Grilled Pizza
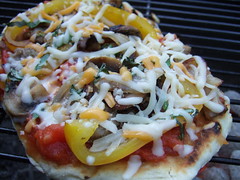
I’m not going to lie to you. Pizza is not the easiest thing to cook on the grill. But you don’t have to be an expert to pull it off, either.
The watchwords for great pizza on the grill are patience and diligence. Pizza is not the kind of grill item that allows you put it on the grate and walk away. You need to stand over it, checking it every minute or so. And when the crust is done, you have to be willing to let it rest on the cooler part of the grill while the cheese melts. For best results, you’ll do small, personal-sized pizzas, one at a time.
First things first: The dough. Remember that pizza dough is a basic type of bread dough. Though you are not allowing it to rise to the height of bread during the cooking process, the dough still has the basic ingredients of good bread dough, and you should allow it to rise at least once. You certainly can use the dough without letting it rise, but you will be happier with the results if you do. You will have a lighter crust with a nicer texture if it has risen at least once.
The next thing to consider is the toppings. If you want a quick pizza the kids will like, spread a good, jarred spaghetti sauce on and top it with a store-bought shredded pizza cheese mixture and pepperoni. Grownups may prefer a nice, light, homemade tomato sauce, fresh buffalo mozzarella slices and grilled Italian turkey sausage. Whichever way you go, set up your toppings for easy access before you start cooking. This technique, called mis en place, or “everything in its place,” will come in handy during the grilling process.
When you have your dough ready and your toppings set up nearby, it’s time to start to your grill. I will admit to you now that I thought I was going to have to tell you that gas grills reign supreme when it comes to cooking pizza. My first attempt at pizza, on my charcoal grill, was not that great. But when I tried this process again, with gas and charcoal grills going side-by-side, I found good results from both. I’d like to blame my grill, especially since I’m lobbying for a new one, but I have to admit that I think the cook might have been the culprit.
If you have a gas grill, turn one burner to “high” and the other burner to “medium” or “low.” If you are working with charcoal, start a good, hot fire on one side. Once your fire is going, scrape a few pieces of charcoal toward the center. Whichever type of grill you use, you want a hot fire on one side and a cooler spot on the other. Assemble your barbeque tools. For best results, have ready a long pair of tongs and the largest metal spatula you can find.
Once you’ve shaped your pizza crust according to the recipe, spread oil on the top. This is the side that will go down first. With an oiled paper towel, rub the grates over the hot side of the grill. Pick up your pizza crust and place it oil-side down on the grate. I found it best to lay the dough on my pizza peel (you could use the back of a cookie sheet if you have no peel), oil it, slide it to the edge of the peel and then onto my hand. With about one third of the dough on my hand, I drag the rest of it off the peel and let the dangling end down onto the grill grate, oil-side down. Then I ease the rest of the dough onto the grate.
Keep your eyes on the pizza dough. After a minute or so, depending upon the temperature of your fire, you’ll be able to lift the edge of the dough with your tongs. As soon as the dough gets to the color you want, remove it from the grill with the spatula. I usually find that one half is just right and I need to turn the dough 180 degrees to get the other half brown. The top will still be pretty raw.
After you remove the dough from the grill, take it to your topping table. Brush oil liberally over the uncooked part and place it oil-side down on a dinner plate or other flat surface. Now you are ready to dress the cooked side.
When you dress your pizza, remember you are going to be manipulating it a bit on the grill. If you laden it down with a lot of heavy toppings, you’ll run the risk of dropping bits and pieces into the fire. Try to keep your cheese a bit away from the edge, too. As it melts it will run and could drip into the fire and cause flare-ups.
Take your dressed pizza, on the plate, back to the grill. Slide it carefully off the plate onto the hot side of the grill. Follow the same technique as you did the first time, checking every minute or so for browning on the bottom, turning as needed. When the crust is the way you want it, slide the pizza over to the cool side of the grill.
At this point, depending upon the heat of your fire, your cheese may or may not be melted. If it still needs a bit more time, leave the pizza on the cool side and shut the lid on the grill. Go prepare your next pizza crust, periodically checking the status of the cheese on the cooking pizza. Remove the one from the grill when the cheese is ready and start the entire process over with the next pizza.
For The Lancaster News
Tomorrow I'll post the pizza dough and tomato sauce recipes
Tuesday, August 30, 2005
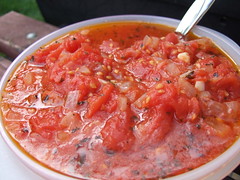
Cincinnati Turkey Chili
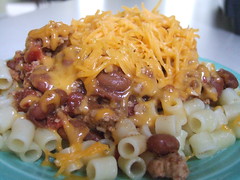
This recipe is from Weight Watcher's "Simply the Best All American" cookbook. The recipe does not call for cheese, although it is mentioned in the blurb above it. It is supposed to serve 4, but we had 5 and I'm eating this serving pictured for breakfast. Perhaps it went further because we put cheese on it?
The recipe is based upon Cincinnati Four-Way Chili, which my family tried while passing through Cinci this summer. We loved Skyline's chili that day and this recipe even more, as it had less cardamom and allspice than Skyline's.
Four-Way Cincinnati Turkey Chili
1# lean ground turkey
1 large onion, chopped
2 cloves garlic, chopped
1 tablespoon chili powder
1 1/2 teaspoons packed brown sugar
1/2 teaspoon salt
1/2 teaspoon ground cumin
1/4 teaspoon ground allspice
1/4 teaspoon ground cardamom
1/4 teaspoon freshly ground black pepper
1 (13 3/4 oz) can low-sodium beef broth
1 (10-oz) can Rotelle tomatoes
1 tablespoon cider vinegar
4 cups cooked elbow macaroni (pictured is ditalini)
1 (15 1/2 oz) can chili beans in sauce, heated
8 scallions, chopped
Cook the turkey, onion and garlic in a non-stick skillet until turkey is browned and onion is tender, about 5 minutes.
Add the chili powder, brown sugar, salt, cumin, allspice, cardamom and pepper; stir until the spices coat the turkey mixture.
Stir in the broth, Rotelle tomatoes and the vingar; bring to boil. Reduce heat, partially cover, and simmer until the broth is thickened and flavors are blended, 30-40 minutes.
Serve the chili over the noodles and top with beans and scallions.
442 calories, 4g total fat, 10g dietary fiber
Additional note: I browned the turkey, onion and garlic, tossed with the seasonings and then dumped the whole thing, along with all the rest of the ingredients except for the noodles and scallions, into my crockpot. I turned the crockpot to "low" and left for the afternoon. When I came back 4 hours later, I cooked up the noodles, grated some cheese and we had supper about 20 minutes later. It was great for a day when I was home earlier in the day but gone right before evening activities were to start.
At this point I'd like to invite you to support the Susan Komen Race for the Cure we are having in the Charlotte, NC area on October 1. My Jazzercise class is going to the race and if you'd like to sponsor us, please click here. Thanks for your support!
Saturday, August 27, 2005
Pressure Cooker Beef Stew
This meal took about an hour to make. A pretty good deal, I think. Usually it takes me 5-6 hours to make this stew in the oven, or even longer in a crockpot.
This recipe is from the Mirro manual that came with my pressure cooker. It's for a 6-8 quart cooker. Another note: usually I use a chuck roast for my stew. The meat is more tender and, a lot of times, cheaper. But since I was using the pressure cooker and the stew meat was on sale, I used that instead. I found the meat to be just as tender as my usual stew.
3# stew meat
2 Tbsp shortening
2 Tbsp kosher salt
1/2 teaspoon pepper
1/2 teaspoon paprika-I used half-sharp
1 3/4 cups water
2 medium onions, chopped
7-8 carrots, cut in half
8 potatoes, peeled and cut in half or quarters
Brown the beef in the shortening in small batches. Remove from pot and sprinkle with salt, pepper and paprika (I ended up using more than the suggested amounts of the spices).
Place the rack in the bottom of the cooker and return the meat to it. Cover and bring to pressure at 10 lbs. Once pressure is reached, cook for 10 minutes. Cool by turning the heat off for 5 minutes, then run under cool water to release the pressure.
Add the veggies. Cover and bring back to 10 lbs pressure and cook for 10 minutes.
Cool instantly by removing from heat and running under cool water.
Remove the stew to a bowl and make gravy with the drippings. Pour the gravy over the stew and toss to coat. Serves 8-10
GRAVY
Pour drippings into a measuring cup. For each cup of drippings, you'll need a thickener made of 2 Tablespoons flour and 1/4 cup of cool water. This stew made a little over 3 cups of gravy, so my thickener was 3/4 cups cool water and 1/4 cup + 2 Tablespoons flour.
Bring the drippings back to a simmer, stir in the thickener and cook, stirring constantly until smooth and there is no flour taste.
Tuesday, August 23, 2005
Freezing Okra
No photo today. Just a bit of thinking. For the "Sugar & Spice" column in The Lancaster News, I included a blurb about freezing okra. Here is what I said:
"Okra is coming in abundantly now and it’s a good time to lay some by for those winter soups. Start a pot of water boiling. Wash the okra pods and cut off the stem ends without cutting into the pods. Drop the okra into the boiling water and allow it to cook for 4 minutes. If your okra is small, cook for 3 minutes. Remove the pods from the water and cool immediately by dropping into a bowl of ice water. Drain. Slice the okra into rounds or leave whole. Pack into zip-top bags, being sure to leave 1/2 inch of headspace in the bag when sealed. Freeze. Vegetables can be frozen for 8-12 months at 0 degrees.
From the Iowa State University Extension Service"
What I did NOT say is that my own preferred method is to skip the blanching and just cut the okra into 1-inch pieces and freeze them. I did this last year because I'd been advised that I could freeze bell peppers without blanching them. I just chopped the peppers into medium-sized pieces and froze them in snack-sized bags. I figured...what could happen? It's not like I'm going to thaw the okra and eat it raw. It goes into soups and gumbos. So I just skipped the blanching.
I'm still alive.
I did find a spot on Cooks.com that suggests freezing without blanching. But I'm not going to have that printed in the paper. When it comes to advising others, better to be safe than sorry.
Friday, August 19, 2005
Lundberg Black Japonica

Now THIS is good stuff! You know how sometimes you are grocery shopping and for some reason you get stuck in an aisle, with some woman and her 3 toddlers plugging the way in front and a little old couple discussing what kind of [insert product name here] they got last time that they really liked and how they better be sure to get more of that this time?
Well, when that happens, it can pay to browse the shelves near you. You sometimes find interesting stuff and it keeps you from pulling your hair out. This Lundberg Black Japonica was what I found on the shelf in my last traffic jam at Lowe's grocery.
It took a little longer than basmati rice to cook ... about 45 minutes, actually. And instead of using 2 cups of plain water, I put 4 vegetable bouillion cubes in with it, along with a speck of olive oil. It was a big hit at home and this package was about $2.69 or thereabouts. I'll buy it again. It's a nice change from potatoes,noodles or white rice for a starch. More substance and fiber, too.
Wednesday, August 17, 2005
Pressure Cooker Fried Chicken
This is definitely something I'll do many, many times.
This recipe is for a 6-8 quart Pressure Cooker.
2 1/2-3 lbs Chicken Pieces
1/2 cup Flour
1 Tbsp Kosher Salt
1/4 tsp Paprika (I used half-sharp, to make it "zippy")
1/4 cup Shortening
2 sm Onions, cut into halves
1 1/4 cups Water
Mix flour, salt, pepper and paprika together on a plate. Coat the chicken with the flour mixture.
Brown the chicken pieces, a few at a time, in hot shortening in the pressure cooker.
Place the rack in the bottom of the cooker. Place the chicken pieces on the rack, put the onion pieces on top and carfully pour in the water.
Cover, set the control at 10 and cook 15 minutes after the control jiggles, or cook at 15 for 12 minutes.
Cool the cooker normally for 5 minutes, then place under faucet.
Once the pressure is released, take the lid off the pot. Place the chicken on a cookie sheet and put it under the broiler for a few minutes to crisp.
Prepare gravy with the drippings.
GRAVY:
Skim any excess fat from the broth. Add enough water to the broth(if necessary) to measure 2 cups. Heat to simmering.
Mix 1/4 cup Flour with 1/2 cup Cold Water until smooth.
Gradually stir the flour mixture into the hot broth.
Cook over medium heat, stirring constantly, until the gravy is smooth and thickened.
This recipe from the Mirro Recipe & Instruction Book that came with my Pressure Cooker.
Sunday, August 14, 2005
Pork Loin
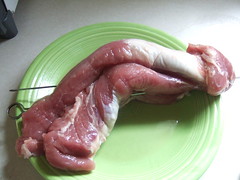
Smithfield is the preferred pork producer in our local grocery stores, it seems. In Minnesota it was Hormel. Hormel pork loin packages contain one piece. I was surprised to see two pieces in this Smithfield package. And dismayed. One end of each piece was very thick, the other rather thin. I decided to tie the two pieces together for more even cooking. No butcher's twine. Toothpicks? Too short. Finally I decided to skewer the two pieces together before placing it on the grill.
They turned out great.
I did not put anything on the loin. Didn't even salt and pepper it. It was not a pre-marinated one, either. I just decided to put soaked mesquite chips on the charcoal while it was cooking. That turned out to be all the flavor I needed.
Chuck Roast in a Pressure Cooker
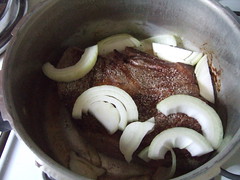
A friend reminded me of the convenience and quickness of the pressure cooker. I drag it out only about 4 times per year, always for roast beef. I've never had roast beef turn out more juicy and tender than when it's been cooked under pressure.
This particular meal had problems, though. When you don't use the appliance very often, then each time you do, you have to learn its idiosyncracies all over again. In this case, I had the pressure too high and the selective control never jiggled. While it was steaming steadily, I mistakenly thought it was still BUILDING pressure, not that it was already at it's maximum. Consequently, I cooked the roast too long, waiting for the control to jiggle. Finally a burning onion smell prompted me to reduce the pressure and open it.
I did find the bottom of the roast burned to the pan and the onions were a disintegrated mess, but the roast itself was as flavorful and moist as it always is. Of course, since the bottom of the pan was full of burned meat, I couldn't make gravy out of it, but we were fine.
I really need to get this thing out more often.
Saturday, August 13, 2005
Grilled Okra

This might become my new food obsession for the next month. I do like Okra very very much. That is an aspect of the southern culture that I, a "damn rich yankee," can definitely embrace. My mom also likes okra very much and last August we had several late-afternoon snacks of fried okra.
But this grilled thing is even better.
I get a lot of food from my CSA farmer and yesterday, while waiting for my roast to cook in the pressure cooker, I quickly washed off some red and green okra, dried it, rolled it in olive oil, and tossed it onto my new toy ... a Lodge Cast Iron Grill Pan.
There was a smoky haze in the house when I was done, but munching on roasted okra, heavily sprinkled with kosher salt, was well worth it.
And I will not have to share most of the time. My three men will not touch the stuff!
Wednesday, August 10, 2005
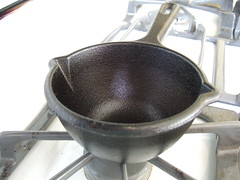
Melting Pot
Here's one of the new toys I bought at the Lodge factory outlet on our way home from Minnesota. It holds about 14 ounces of whatever you want to melt. I could see baking a giant muffin in it, too. It was $10.95. I like having it on the stove all the time, although it can tip over if it's bumped...it just fits on the grates.
Friday, August 05, 2005
These are a few of My Favorite Things
When you move from one part of the country to the other, there is a whole new world of tastes and products available to try.
But sometimes you find yourself wishing for things you used to get easily that don't seem to be available in your new locale.
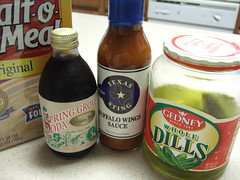
We did eventually find Malt-o-Meal. But it was in single-serving pouches in a grocery store we don't use.
The Spring Grove pop is a Southeast Minnesota thing. It's even a little hard to find in Minneapolis. Spring Grove is a tiny town in SE MN and they have a small company that makes this pop. It comes in orange, root beer, creme soda and lemon sour.
Texas Sting Buffalo Wing sauce. I was really surprised to see we couldn't get that here. We've been using Texas Pete instead.
The dills. Gedney is the "Minnesota Pickle" but I really didn't think that meant we wouldn't find it all over the country. But it's not the brand name we miss ... in fact my husband says he always preferred Vlasic. What we miss is dills that are not kosher. I don't know why they taste different from kosher dills, but they do. And we miss them.
I did not bring back any Hormel Wrangler hot dogs. We missed them like crazy until someone turned us on to Nathan's. We are so over Wranglers now, I suspect we'd have to ship Nathan's if we ever moved back to Minnesota.
But sometimes you find yourself wishing for things you used to get easily that don't seem to be available in your new locale.
We did eventually find Malt-o-Meal. But it was in single-serving pouches in a grocery store we don't use.
The Spring Grove pop is a Southeast Minnesota thing. It's even a little hard to find in Minneapolis. Spring Grove is a tiny town in SE MN and they have a small company that makes this pop. It comes in orange, root beer, creme soda and lemon sour.
Texas Sting Buffalo Wing sauce. I was really surprised to see we couldn't get that here. We've been using Texas Pete instead.
The dills. Gedney is the "Minnesota Pickle" but I really didn't think that meant we wouldn't find it all over the country. But it's not the brand name we miss ... in fact my husband says he always preferred Vlasic. What we miss is dills that are not kosher. I don't know why they taste different from kosher dills, but they do. And we miss them.
I did not bring back any Hormel Wrangler hot dogs. We missed them like crazy until someone turned us on to Nathan's. We are so over Wranglers now, I suspect we'd have to ship Nathan's if we ever moved back to Minnesota.
Tuesday, August 02, 2005
Fresh Tomato Salsa
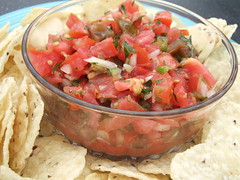
4 large, ripe tomatoes
1/4 cup chopped onions or scallions
1/4 cup chopped cilantro (optional)
1 Tablespoon chopped Italian parsley
1-2 cloves garlic, minced
1-2 fresh jalapeno peppers, seeded and minced
1 Tablespoon olive oil
1 Tablespoon lime juice
1/2 teaspoon finely chopped oregano or basil or dash of dried herbs
Pinch of sugar
Salt and Pepper to taste
Combine all ingredients in a serving bowl, adjusting ingredients to your taste. Cover and set aside for several hours for the flavors to blend. Before serving, drain off excess liquid.
Note: At first, the salsa might seem mild. After it sits for a while, the salsa will get spicier and spicier. A good general rule of thumb is to make the salsa about half as hot as you want it, allowing for the heat to build as it sits.
Monday, August 01, 2005
Back to Cooking & Blogging
Well, I'm home now, and I have some food blog fodder for you, but not today. I picked up a couple of cool culinary items at the Lodge Cast Iron Store in Tennessee, so I'll tell you about those and my first attempt to use them. I also have a tomato article that was in the newspaper on July 20 to put up here for you. I thought I'd saved it to my laptop, but I guess not. So once I get my desktop from the computer guy, I'll upload that for you.
I'm also writing an article today on "Healthy School Lunches" to be in the paper Wednesday. My heart is not in it. I've started to write it once and today I just have to. I also have to get my pizza on the grill experience written and tomorrow night I'll hang with the local boy scouts so I can do a feature on their cobbler. They will be making it for our annual "National Night Out" event.
I'm also responsible for the paper's "Sugar and Spice" column this week, which is a series of food tips down the left side of the B section. Anytime you have tips or interesting trivia, send it to me and tell me I can use it. I usually give them 4 or 5 blurbs. Some examples of past items are: Storing Spices, Keeping Cutting Boards Clean, Care and Cleaning of Garbage Disposals, Where to Pick Your Own Blueberries. I've also included nutrition info on some foods...like the fact that pineapple is an excellent source of vitamin C and may be good for asthmatics because it's a source for the enzyme Bromelain. If you do send some tips, and you got the info from somewhere like a magazine or website, let me know the source.
So come back soon. Like tomorrow.
Monday, July 25, 2005
Ice Cream Freezers
Most of us remember cranking ice cream by hand in Mom and Dad’s or Grandma’s old ice cream freezer. We’d whine and complain about how long it was taking, how hot we were, why we were doing more cranking than our younger siblings. Oh. Wait. That may have just been me.
I doubt it, though.
Purists still say that the old hand-crank freezers make the best ice cream. The reasoning goes that a human can sense when the ice cream is starting to thicken and respond by speeding up the crank. Faster cranking whips more air into the ice cream, giving it a nicer texture.
Hand-crank makers are still available, and you can get a hand-crafted machine with a pine bucket and stainless steel blades from the White Mountain Freezer company (now owned by Rival) for $150-$200. But most of us go for the electric models now. Electric crank models that are similar to the old bucket models run from $20-$40 and can make 4-6 quarts of ice cream. I have one of these and I break it out when I want to make ice cream for a crowd. But for ice cream for the family on a Friday night, I use my Rival 1 1/2-quart maker. The freezer canister has a gel in it that freezes the ice cream without ice. It lives in the deep freeze at my house. When I get the urge to make a batch of ice cream, I mix up the ingredients, take the canister from the freezer, snap on the electric motor unit and in about 15 minutes I have ice cream. It makes a nice, small amount.
Today’s electric ice cream freezers make homemade ice cream a snap. But if you find yourself missing the whining of kids during the freezing process (hey, someone might!), try this recipe for “Kick the Can Ice Cream:”
Kick the Can Ice Cream
A couple of kids, bored ones work best
1 empty 1-pound coffee can, with lid
1 empty 3-pound coffee can, with lid
Masking or Duct Tape
Crushed Ice
3/4 cup salt
3/4 cup milk
1 cup heavy cream
1/3 cup sugar
1/2 teaspoon vanilla
Flavoring, if you choose, like chocolate or strawberry syrup
Mix the milk, cream, sugar, vanilla and flavoring together in the small coffee can. Put the lid on and tape it shut. Place the small can inside the larger can. Pack crushed ice around it. Pour the salt all around on the ice. Put the lid on the can and tape it shut. Have the two bored kids roll the can back and forth with their feet for 10-15 minutes.
This recipe is from http://www.funology.com
Information on ice cream freezers from Alton Brown’s “Gear for Your Kitchen”, Steward, Tabori & Chang, 2003.
For The Lancaster News
Saturday, July 23, 2005
Dinner on the Grill
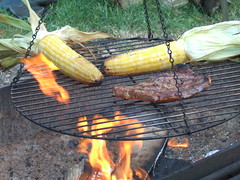
Steak on the grill is one thing. But steak on a campfire is an entirely different experience. You can get that campfire taste by using hardwood charcoal, but sitting around the campfire in lawn chairs, watching your supper cook over an open fire really adds to your meal.
The corn was wonderful. It's recommended that you soak it in water for a while before grilling it, but we found just putting it directly on the grill with the husks peeled back worked just great. And the little fires that burned away the husks were entertaining, too.
Monday, July 18, 2005
Stick to Your Own Backyard
Actually, I do like to travel. But when it comes to food, I find it's best to stay home. I mean that in more than one sense of the word. No, I am not stuck in a rut, thinking I have to eat all one kind of cuisine. I like to try foods from all over the world. I learned that from my mother. And no, I am not necessarily thinking I have to eat at home all the time, never going out to eat at restaurants.
But the fact of the matter is, most of the time the best food I have is that which I prepare myself. And furthermore, the best food I have is locally grown. And to go even further, I really do think it's best to eat what's in season.
That said, here is my conundrum: tomatoes and okra just hit their stride in South Carolina, where I live. What did I do? Did I rush out and get as much of it as I could and then start preserving it for the winter, stuffing as much down my gullet along the way? No! I left on a trip to Minnesota!
Here in Minnesota the tomatoes are still green and very hard. And there is very little okra grown here. It will start coming in at about the time I leave for South Carolina, where the tomatoes will be pretty much done for the year.
So, I'm here for two weeks, feeling kind of bad about missing all that tomato and okra bounty. I am, however, assuaging my grief with lots of fresh sweet corn.
So folks, the posts here will be a bit sporadic for the next couple of weeks. I thought about posting about the places where I'll be eating, but decided against it. I've decided that this food blog is about home cooking, not restaurant cooking. To me, the best food blogs are photos and stories about home cooking efforts. I'll put "eating out" stuff on the other blog: Gone to Carolina, where I'll be posting nearly every day.
Saturday, July 16, 2005
Heart Attack on a Plate
Mmmmm! Okra, rolled in cornmeal and fried in bacon grease. It gave my Zocor prescription a real workout!
The okra came in just days before we left for Minnesota. I had to snag a small amount to snack on before leaving.
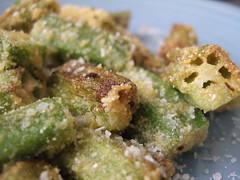
The okra came in just days before we left for Minnesota. I had to snag a small amount to snack on before leaving.
Wednesday, July 13, 2005
Salmon on a Plank
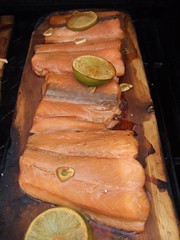
Marinated Teriyaki Salmon Cooked on a Cedar Plank
1 clove garlic, thinly sliced or 1 tablespoon jarred minced garlic
1 lime, sliced
10 oz teriyaki sauce
2 lbs salmon fillets
4 green onions, chopped
3 hours before: stir together garlic, teriyaki sauce and lime. Marinate salmon in sauce. Soak a cedar plank (14x7x1”) in water.
When you are ready to cook, heat the grill to medium-high. Remove the salmon from the marinade and discard the marinade. Remove cedar plank from water and coat the cooking side with oil.
Place the plank on the grill directly over the coals. Place the salmon on top of the plank (if your salmon has the skin still on, place it skin side up to prevent curling) and cover the grill. Cook until the salmon is almost done, when the all but the very center has turned opaque, approximately 10 minutes. Remove the salmon from the plank and place directly on top of the grill grates, turning after 2 minutes and finishing when the center just turns opaque.
Adapted from Aldi’s Fresh, Fun & Easy” cook booklet.
More about Plank Cooking
Using wood planks to cook food is a method that has been around for centuries. Early Native American cooks used wood planks over an open fire to naturally season fish and game. Today this method is employed by home cooks and gourmet chefs alike.
Planks for cooking can be made from cedar, alder, or even recycled oak wine barrels. They can be made at home by the household handyperson or purchased in gourmet cooking supply stores or on the internet. One can even use cedar shingles purchased at a building supply store!
Foods prepared on planks need not be limited to fish and the cooking appliance doesn’t necessarily have to be an outdoor grill. Indeed, plank cooking is an excellent way to experiment with various methods and foods.
To get you started, here are a few tips:
· Always soak your plank in water until fully saturated before using. Two to three hours is a good rule of thumb.
· A little coating of oil on the cooking surface will help prevent sticking, but don’t get oil on the underside, or you could have trouble with flare-ups.
· If you use a thin plank, such as a shingle, have a water bottle handy and don’t walk away. Even properly soaked, a plank will catch fire if the heat is too hot or the plank is too close to the flame. · If you decide to cook on a plank in the oven, stick with the thicker planks and keep the oven temperature to 350 degrees or less.
· After use, if your plank has not burned too much, clean it with hot water (no soap) and place back on a 350 degree grill or in the oven for 15 minutes.
Plank cooking is a great way to impart flavor to foods with minimal fuss. The dishwashers of the family will like them too, as clean-up is easy and the food can even be served right on the plank.
Surf the internet for recipes and methods and “play with your food!”
Information for this article was seasoned with information from http://greatlakesgrilling.com
Tuesday, July 12, 2005
Peach Ice Cream

I've decided I just don't like photographing peaches. The color just never seems to come out!
I've made this ice cream twice now. With my little Rival Electric Ice Cream Maker(1/5 qt capacity), making ice cream is an easy, last-minute dessert decision.
1 1/2 cup 1% milk
3/4 cup sugar
dash salt
1 cup 2% milk
1/2 cup half n half
1/2 tsp vanilla extract
3 or 4 peaches
Combine 1% milk, sugar and salt. Stir with a wire whisk until the sugar is dissolved. Stir in 2% milk, half n half and vanilla. Pour into freezer and begin freezing process.
Meanwhile, peel, pit and chop peaches. Mash them with a potato masher or, if you prefer no chunks in the ice cream, puree them in a food processor or blender.
When the ice cream is just about done, pour in the peaches. Continue freezing until the ice cream is the consistency recommended by the freezer manufacturer.
Pull out the freezer paddle, tamp down the ice cream with a spoon, loosely cover, and place the freezer into your refrigerator-freezer for 30 minutes or so.
Of course you can make a richer version of this ice cream subbing whole milk for the 2%, half n half for the 1% and whipping cream for the half n half. Because I could not find organic whipping cream up until 2 days ago, I started making this lower fat version. I'm not sure whether we'd even like the full fat version anymore.
Monday, July 11, 2005
Hot Sausage & 3 Peppers
The hardest part about this meal was finding hot italian turkey sausage. In fact, I never did. The grocery stores by me carry italian turkey sausage, but it was sweet, not hot.
So this meal was made with pork sausages.
3 pounds red potatoes, quartered
4 teaspoons olive oil, divided
3/4 teaspoons salt, divided
1/4 teaspoon freshly ground black pepper
6 hot italian turkey sausages (I had 5 in my package)
3 bell peppers, cut into strips (red, yellow, orange)
2 garlic cloves, minced
2 tablespoons balsamic vinegar
1 teaspoon dried rosemary
1/4 teaspoon crushed red pepper
Preheat oven to 375.
Arrange the potatoes in a single layer on a cookie sheet. Drizzle with 1 teaspoon oil, sprinkle with 1/2 teaspoon salt and black pepper. Toss to coat. Bake for 40 minutes or until tender, turning occasionally.
While the potatoes cook, heat 1 teaspoon oil in a large nonstick skillet over medium-high heat. Pierce the sausages several times and add to the pan. Cook 5 minutes or until lightly brown. Remove from pan.
Heat 2 teaspoons of oil in the pan. Add bell peppers; saute 5 minutes or until tender. Add garlic; saute 1 minute. Stir in 1/4 teaspoon salt, vinegar, rosemary and crushed red pepper. Return the sausages to the pan; cover and cook over medium-low heat until the sausages are done at 175 degrees, approximately 15 minutes.
From "Cooking Light" magazine, November, 2004. I served this with swiss chard sauteed in garlic-infused oil.
Saturday, July 09, 2005
Green Beans in Butter
Sometimes you just have to treat yourself to a lot of butter in a dish. Fresh green beans from the farm are perfect for this.
Just snap the ends off and lay the beans in a skillet. Drop in a few pieces of butter, maybe a garlic clove or two and some onion. Drop the lid on and let the beans cook at a low temperature for a while. Just until they are al dente.
I do have to say, however, that if you get hooked on this, you can make it a bit healthier by using a flavored olive oil instead of butter.
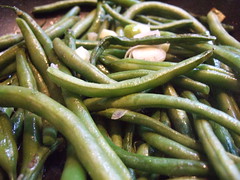
Thursday, July 07, 2005
Turned Chicken

This is one of my favorite ways to cook chicken. The other favorite is roasting a butterflied bird at 500 degrees. I'll show you that next time I do it.
The "turned" method of cooking a whole bird is one I found in The All New All Purpose Joy of Cooking. I like it because the breast is still moist when I'm done.
This particular bird is a compilation of two recipes in Joy. The other recipe is called "Roasted Chicken with Herbs and Garlic." Here's what you do:
1 whole chicken (4 to 7 pounds)
2 tsps minced fresh rosemary or thyme (or 3/4 tsps dried)
1 tsp grated lemon zest
2 to 3 medium cloves garlic, minced
1/4 tsp red pepper flakes
1/2 tsp salt
Preheat oven to 400 degrees.
Rinse the chicken and pat dry. Mix together the rest of the ingredients. Loosen the skin on the breast and thighs and rub the herb mixture between the skin and meat.
Position the chicken on its side on a rack. You'll have a leg facing up. If your rack is flat, prop the bird up on balls of foil.
Roast for 25 minutes. Remove from oven and turn the bird over so the other leg is up. Roast another 25 minutes. Take the bird's temperature. You are looking for 175 degrees in the thigh and 165 in the breast. Keep checking the temp and flipping the bird back and forth every 20 minutes until you hit those temps. This bird was about 6 pounds, so it really took about 1 1/2 hours total to cook, so I flipped it 3 times altogether. Once you hit your target temp, remove from the oven and rest. Carryover cooking should get that temp to the suggested 180 for dark meat and 170 for white.
Wednesday, July 06, 2005
Peach Varieties and Uses
Before I moved to the southeast, I thought a peach was a peach was a peach. And in Minnesota they all seemed to come from California or Chile. They were hard to buy because they’d look great in the grocery store but invariably be dry or tasteless when I got them home. To be honest, I probably bought only about a dozen peaches in my life before moving to South Carolina. Now I live just “up the road a piece” from Springs Farm. I can go pick peaches myself or just stop in and buy a basket of fresh-picked peaches by the basket.
But what really has stunned me is the number of varieties of peaches and nectarines. Springs Farm of Fort Mill grows and sells 29 varieties of peaches and nectarines from June 1 to September 1. When you go to one of their farm stands, you can request a card that shows the variety names and when they are expected to be ripe.
Generally speaking, peach varieties are sorted into three different categories: clingstone, freestone, and semi-free. Clingstone peach flesh adheres to the pit; freestone fruit breaks away from it easily. Semi-free is a happy medium. Clingstone peaches tend to be best for jams, jellies and pickling. Freestone peaches are great for just eating fresh, freezing and using in recipes. Semi-free are good for all uses.
Besides yellow-fleshed peaches, there are white peaches and nectarines to consider. They tend to be sweeter than yellow ones, but the flavor is more delicate. Be careful using them in recipes. They can be easily overpowered if used in recipes with other strong flavors. Last summer I ruined a batch of organic white peaches by using Mexican vanilla with them in peach ice cream. Next time I’ll stick with a non-Mexican vanilla, and I may halve the amount, as well.
Place firm peaches on the counter for a day or two to ripen. You can hurry them along by putting them in a brown paper bag, but check them every few hours because they can go bad quickly. Once they are ripe, peaches can be moved to the refrigerator, where they will keep for about a week. Sliced peaches can be kept from browning by sprinkling them lightly with Fruit Fresh®, which can be found in your grocer’s canning section.
Springs Farm Peach Stand on Highway 160 and 21 Bypass, and their Farm Market on Springfield Parkway are open seven days a week. The Farm Market is open from 7 a.m. to 7 p.m. Monday through Saturday and noon to 7 p.m. Sundays. The Peach Stand is open until 9 p.m. Sunday though Friday and until 10 p.m. on Saturday. Opening hours vary. Call them at 803.547.7563. They also have a website with internet mail order available. Their address is http://www.springsfarm.com/. They do a fantastic job packing peaches for shipping.
Now that I’m a Carolinian, I can definitely agree with author George du Maurier, who said “An apple is an excellent thing, until you have tried a peach.”
Information for this article was harvested from http://www.gapeaches.com, the website for Dickey Farms of Musella, GA.
For The Lancaster News
Subscribe to:
Posts (Atom)